Ssul's Blog
React Native 구글 소셜로그인 구현 본문
배경: React(프론트)-Django(백앤드)로 구성된 웹앱 서비스를 리액트 네이티브로 ios/android앱 구현하기
들어가기. 구글로그인 프로세스
1. 구글 버튼을 눌러 구글서버로 소셜로그인/회원가입 요청(https://accounts.google.com/o/oauth2/v2/auth)
2. 구글 로그인창 > 로그인 > 성공하면, 구글 토큰리다이렉트 주소 호출(https://oauth2.googleapis.com/token)
3. 그 토큰으로 구글 정보 요청(https://www.googleapis.com/oauth2/v1/userinfo) 해서 받고,
4. 쿠키나 token 백엔드에서 커스터마이징 셋팅 후, 프론트로 전달
0. 구성별(React, RN) 소셜로그인 프로세스
0-1. (웹앱) React-Django 구성(지금 서비스)
1. 프론트에서 소셜로그인 버튼 클릭 > 백앤드 서버 api호출
2. 백앤드에서 구글 서버로 로그인 요청-https://accounts.google.com/o/oauth2/v2/auth
3. 구글 로그인창 > 로그인완료 > 로그인 요청 함께 준 리다이렉트 (백앤드)주소 호출
def request_google_login(request):
    state = get_random_string(32, allowed_chars=string.ascii_letters + string.digits)
    query = urlencode(
        {
            "client_id": GOOGLE_CLIENT_ID,
            "redirect_uri": REDIRECT_URI,
            "response_type": "code",
            "scope": "profile email",
            "access_type": "offline",
            "state": state,
        }
    )
    response = django_redirect(f"{GOOGLE_OAUTH_URL}?{query}")
    cb = re.search("cb=(.+)", request.get_full_path())
    cb = APP_URL + (cb and cb[1])
    response.set_cookie("cb", cb, httponly=True)
    response.set_cookie("state", state, httponly=True)
    return response
4. 백앤드에서 구글 서버로 토큰요청-https://oauth2.googleapis.com/token > 토큰받고 > 토큰으로 유저정보 요청 > 유저정보 받음
def authorize_with_google(request):
    cb = request.COOKIES.get("cb")
    if not cb or cb == "None":
        cb = "/"

    csrf_token = request.COOKIES.get("state")
    if csrf_token != request.GET.get("state"):
        # error in login
        return build_unauthorized_response(cb)

    token_res = requests.post(
        GOOGLE_TOKEN_URL,
        {
            "code": request.GET.get("code"),
            "client_id": GOOGLE_CLIENT_ID,
            "client_secret": GOOGLE_CLIENT_SECRET,
            "redirect_uri": REDIRECT_URI,
            "grant_type": "authorization_code",
        },
    )
    if not token_res.ok:
        return redirect(f"{APP_URL}/error?type=auth&status=424&next={cb}")

    token_body = token_res.json()

    user_res = requests.get(
        GOOGLE_GET_PROFILE_URL,
        {"alt": "json", "access_token": token_body.get("access_token")},
    )
    if not user_res.ok:
        return redirect(f"{APP_URL}/error?type=auth&status=424&next={cb}")

    account = user_res.json()

    response = build_authorized_response(cb)
    response.set_cookie("provider", "google", httponly=True, max_age=60 * 60 * 1)
    response.set_cookie(
        "email", account.get("email"), httponly=True, max_age=60 * 60 * 1
    )
    response.set_cookie(
        "service_id", account.get("id"), httponly=True, max_age=60 * 60 * 1
    )
    return response
5. 받은 유저정보를 프론트에 Respone
6. 프론트는 받은 정보로 백엔드 서버에 로그인 api호출
7. 가입한 계정이면 로그인 > 메인화면
8. 가입하지 않은 계정이면 > 회원가입 마져 진행
0-2. (앱) React native-Django 구성
기존 리액트와 동일한 과정으로 풀어내고 싶었지만, 아직 RN에 대한 지식이 많이 부족해서....외부 링크를 창으로 띄우는 것이 쉽지 않았다. 그래서 1-5과정을 RN에서 처리하고, 6-8을 서비스 서버와 소통하는 형태로 진행
1-5과정. RN에서 소셜로그인 호출 > 로그인 완료 > 토큰받아서 > 토큰으로 User정보 획득
6. 받은 정보로 백엔드 서버에 로그인 > 백앤드서버에서 accessToken 생성 후, Response
@api_view(["post"])
@permission_classes([])
def authorize(request):
    if request.META.get("HTTP_LOE_SECRET_KEY") != os.getenv("HTTP_SECRET_KEY"):
        raise PermissionDenied(_("there is no permission"))
    username = hashlib.md5(request.data.get("email").encode()).hexdigest()
    user: Union[User, None] = User.objects.filter(username=username).first()
    if not user:
        raise NotFound(_("not found"))
    if user.is_deleted:
        user.restore()
    login(request, user)
    return Response({"msg": "ok",
                     "accessToken": request.data['accessToken']})
7. 받은 accessToken을 EncrypteStorage에 보관
8. 앱은 매번 EncrypteStorage의 accessToken 유무를 체크하여 로그인 여부 판단
그럼 소셜 로그인을 구현해보자!
1. 구글 로그인 api 계정발급
1. https://console.cloud.google.com/
2. API 및 서비스 > 사용자 인증정보 클릭
3. 사용자 인증정보만들기 > OAuth 클라이언트 ID 만들기
4. 애플리케이션 유형선택:
*우선 웹클라이언트, IOS 두개만 만들어도 되는것 같다. 난 android도 만들었지만...클라이언트ID가 같아서 따로 사용안했다는
**구글 OAuth생성 관련은 잘 정리해주신분들이 많으니 그거 참고해주세요 :)
1-1. ios(아이폰앱)관련 추가 작업
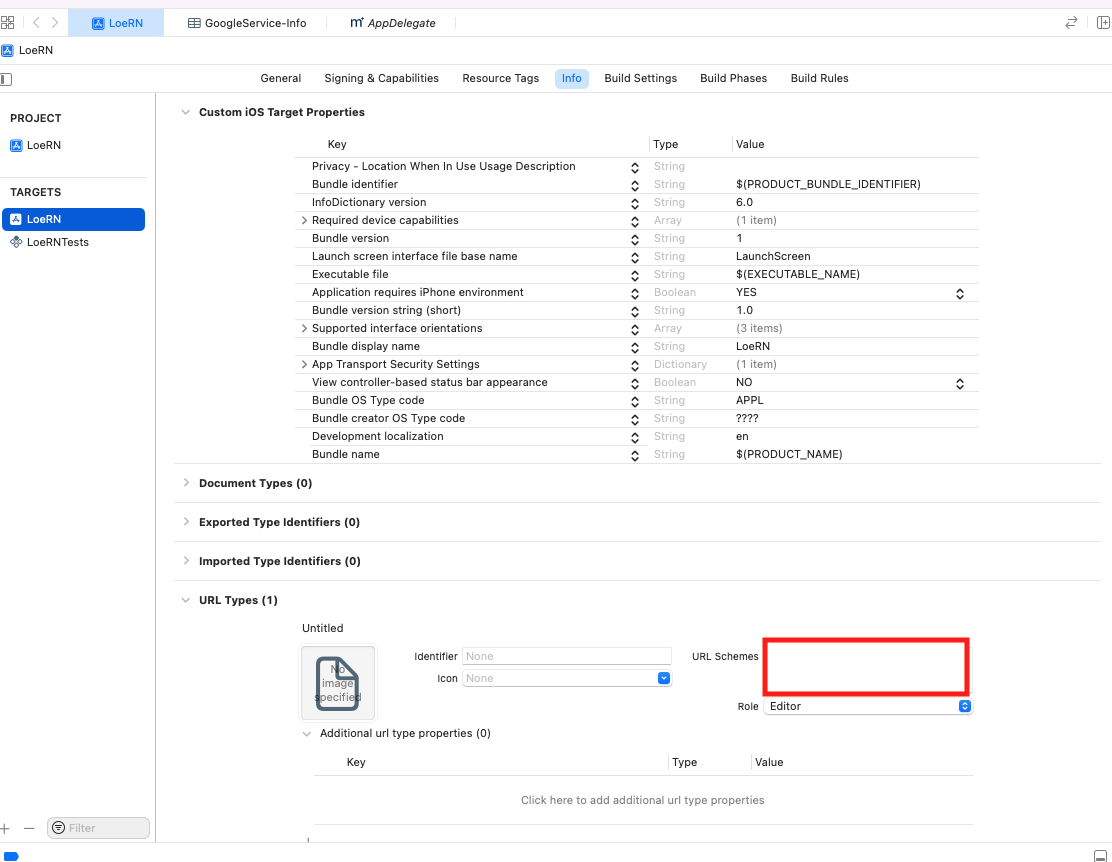
- OAuth의 iOS URL 스키마를
- xCode -> TARGETS(프로젝트밑에) > info > URL Types +버튼 누르고, > URL Schemes에 입력


1-2. 구글 콘솔에서 PLIST를 다운받아서 복붙(우선 나는 1-1만해도 해결되었다. )
2. google-signin 패키지 설치
npm i @react-native-google-signin/google-signin
3. 코딩
import {
  GoogleSignin,
  statusCodes,
} from '@react-native-google-signin/google-signin';


GoogleSignin.configure({
  scopes: ['https://www.googleapis.com/auth/drive.readonly'],
  webClientId:
    '여기에 구글 클라이언트ID',
  offlineAccess: true,
  hostedDomain: '',
  forceCodeForRefreshToken: true,
  accountName: '',
  iosClientId:
    '여기에 ios URL 스키마..(중요)여기선 똑바로쓰기...com이 제일 뒤로',
  googleServicePlistPath: ''
  openIdRealm: '',
  profileImageSize: 120,
});


function IntroPage({navigation}: IntroPageScreenProps) {
  const dispatch = useAppDispatch();
  const toSignIn = useCallback(() => {
    navigation.navigate('SignIn');
  }, [navigation]);
  const toSignUp = useCallback(() => {
    navigation.navigate('SignUp');
  }, [navigation]);
  const signInGoogle = async () => {
    console.log('google');
    try {
   	  //이 두줄로 소셜로그인 완료하고, 구글의 user정보 획득
      await GoogleSignin.hasPlayServices();
      const userInfo = await GoogleSignin.signIn();
      console.log('userInfo', userInfo);

      // /auth/authorize로 로그인 시도해서 성공하면 가입한 아이디니 바로 메인, 아니면 추가입력으로
      const API_URL =
        Platform.OS === 'ios'
          ? 'http://localhost:8000'
          : 'http://10.0.2.2:8000';
      console.log(API_URL);
      console.log('http:', Config.HTTP_SECRET_KEY);

      const response = await axios.post(
        `${API_URL}/auth/authorize`,
        {email: `google_${userInfo.user.id}@xxxxxxx.com`},
        // TODO: HTTP_SECRET_KEY설정 필요
        {headers: {'SECRET-KEY': Config.HTTP_SECRET_KEY || ''}},
      );
      console.log(response.data.accessToken);
      dispatch(
        //요 친구들이 다 action.payload에 저장
        userSlice.actions.setUser({
          email: response.data.email,
          accessToken: response.data.accessToken,
        }),
      );
      // 받은 accessToken을 스토리지에 저장
      await EncryptedStorage.setItem('accessToken', response.data.accessToken);

    } catch (error) {
      if (error.code === statusCodes.SIGN_IN_CANCELLED) {
        // user cancelled the login flow
      } else if (error.code === statusCodes.IN_PROGRESS) {
        // operation (e.g. sign in) is in progress already
      } else if (error.code === statusCodes.PLAY_SERVICES_NOT_AVAILABLE) {
        // play services not available or outdated
      } else {
        // some other error happened
      }
    }
  };

  return (
    <View
      style={{
        flex: 1,
        flexDirection: 'column',
        backgroundColor: 'white',
        alignItems: 'center',
        justifyContent: 'center',
      }}>
      <View>
        <View
          style={{
            justifyContent: 'center',
            alignItems: 'center',
          }}>
          <Logo />
        </View>
        <View
          style={{
            justifyContent: 'center',
            flexDirection: 'row',
            margin: 5,
          }}>
          <Text>습관만들고 일기쓰면서,</Text>
          <Text
            style={{
              color: '#6562F5',
              fontWeight: 'bold',
            }}>
            {' '}
            용돈벌어요!
          </Text>
        </View>
        <View
          style={{
            margin: 30,
          }}>
          <LogoImgage />
        </View>
        <View
          style={{
            justifyContent: 'center',
            flexDirection: 'row',
            margin: 5,
          }}>
          <Pressable
            style={{
              borderRadius: 35,
              backgroundColor: '#FBE74D',
              alignItems: 'center',
              justifyContent: 'center',
              padding: 15,
              margin: 8,
            }}
            onPress={() => {
              console.log('click');
            }}>
            <KakaoIcon />
          </Pressable>
          <Pressable
            style={{
              borderRadius: 35,
              backgroundColor: '#f3f3f3',
              padding: 15,
              margin: 8,
            }}
            onPress={signInGoogle}>
            <GoogleIcon />
          </Pressable>
        </View>
        <View
          style={{
            justifyContent: 'center',
            alignItems: 'center',
            margin: 5,
          }}>
          <Text>또는</Text>
        </View>
        <Pressable
          style={{
            justifyContent: 'center',
            alignItems: 'center',
            backgroundColor: '#6562F5',
            borderRadius: 20,
            margin: 10,
            padding: 10,
          }}
          onPress={toSignIn}>
          <Text
            style={{
              color: 'white',
              fontWeight: 'bold',
            }}>
            이메일로 로그인
          </Text>
        </Pressable>
        <View
          style={{
            justifyContent: 'center',
            flexDirection: 'row',
          }}>
          <Text>OO서비스가 처음이라면, </Text>
          <Pressable
            style={{
              justifyContent: 'center',
              alignItems: 'center',
            }}
            onPress={toSignUp}>
            <Text
              style={{
                color: '#6562F5',
                fontWeight: 'bold',
              }}>
              회원가입
            </Text>
          </Pressable>
        </View>
      </View>
    </View>
  );
}

export default IntroPage;
이렇게 하면, 기존 이메일 입력로그인과 동일하게, 소셜로그인 완료 후, accessToken이 리듀서와 로컬스토리지에 생성. 그리고 이를 통하여 isLoggedIn이 true가 되어 로그인 된 화면으로 이동하게 된다
'dev > 기능구현' 카테고리의 다른 글
| restframework-simplejwt 사용하기 (0) | 2023.04.19 |
|---|---|
| React Native IOS배포하기 (0) | 2023.02.28 |
| 아임포트로 구독결제 구현하기(django, react, restframework) (0) | 2023.02.03 |
| django 이번주 월요일 찾기 > 일주일 쿼리셋 구해서 > 직렬화해서 클라이언트 응답 (0) | 2022.10.05 |
| 게시판 검색기능 구현(검색어 입력 & 버튼값으로) (0) | 2020.09.27 |


